Captioning with SubCap
In this blog article, I explain a case study to create an ‘Import Caption Data’ file for Avid Media Composer.
Adding subtitles
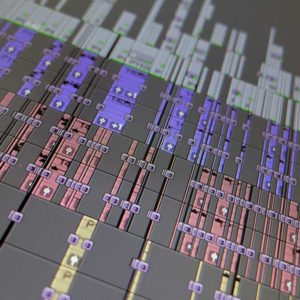
As a freelance video editor in London, I edit subtitles to my films and videos when requested. Working with the software Avid Media Composer, I use the SubCap effect laid on a newly created video track over the length of the film edit. It can help to save time by using the automated ‘Import Caption Data’ option, selectable under SubCap Caption Files.
I usually add subtitles to my films and videos towards the end of the editing process. Before I add subtitles, I would be happy with my audio edit. Of course, every edit is always subject to change.
Case study interview
I’d been commissioned to film a two-camera two-person interview with a medical specialist and an industry product manager. Filming took place at John Radcliffe Hospital in Oxford. My brief was to condense a 45-minute interview into a 15-minute version and add subtitles.
Crafting the edit
I first edited down the interview to the desired length, ensuring the key messages were included. Next, I made the edit work visually, cutting between the two cameras and editing in b-roll footage. Once the edit was working well, I started the process of adding subtitles.
SubCap automation
Editing subtitles onto longer form projects is not something I do very often. So, it took a bit of trial and error before I eventually got SubCap automation working this time around. For Avid SubCap ‘Import Caption Data’ to work, the data file has to be perfectly correct. I wanted to document the process to help anyone else looking to import caption data using the Avid SubCap effect.
For this case study, I created a compatible text file with a .txt extension.
System specs
My system specs at the time of the case study are:
Mac Studio m4 Max, Sequoia 15.6.1, Avid Media Composer version 2025.6
Transcribing audio
I first ensured the sequence start timecode was set to 00:00:00:00. My project frame rate was 25fps. I then exported the edited film’s interview audio into a .wav file. I then transcribed this audio file into a text document with timecode. After trying a few options, I found SimonSaysAI to be helpful. I was able to set the project framerate of 25 fps, thus ensuring the transcribed timecodes were all the correct values. After the audio file had been transcribed, I exported the transcript from Simon Says AI as a Word .doc file.
Editing the transcribed file
After many trials, I realised I needed to edit the exported doc further. The correct text file must look like this below. So, for my 25fps project, all the frame numbers were between 00 and 24. Some of the text added to the top of the file by Simon Says had to be removed. I had to add the text <begin subtitles> at the very top and <end subtitles> at the very bottom of the .text file. The dashes between the in and out timecodes also needed removing. All pretty quick things to do. So, I ended up with this format, which shows the beginning and end timecodes of a larger text file. Each timecode line showing the start and end timecodes of one subtitle caption.
<begin subtitles>
00:00:05:11 00:00:22:08
text
00:00:22:15 00:00:43:24
text
00:00:44:09 00:00:48:22
text
00:00:49:10 00:00:55:20
text
00:13:50:18 00:14:31:19
text
00:14:31:24 00:14:39:20
text
<end subtitles>
Editing the transcribed text
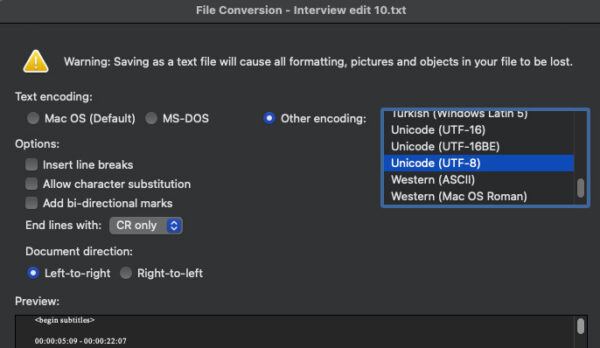
After editing the text in Word I double checked that all of my timecodes were valid, not over lapping and with the correct number of frames. This resulted in a file that was the same as the above format. I then exported the file as a .txt file. After selecting Save As, a .txt file, you get some options in Word. From the available options, I selected ‘other coding’ and then Unicode (UTF-8). This then exports a .txt file that you can choose for Import Caption Data in Avid Media Composer.
SubCap effect
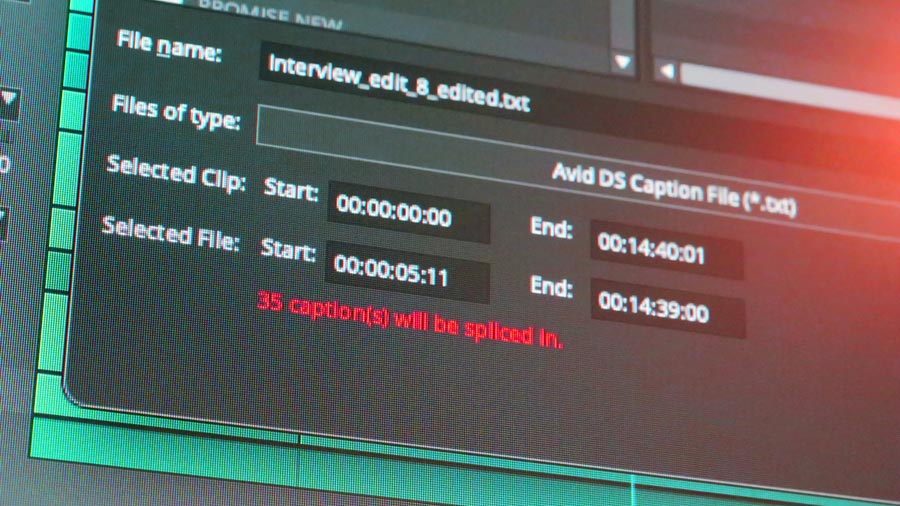
To import your .txt file captions, first create a new video track. Then add the SubCap effect onto that video track. With that track selected, go to effect mode. On the SubCap effect panel, under caption files, choose ‘Import Caption Data’. A new dialogue box will open. Select Files of Type to be Avid DS Caption File (*.txt). Navigate to the .txt file you have created and select open.
The SubCap effect will now be populated with the caption text. You might need to break up the subtitles so each one has fewer words, but at least the main body text is imported. You then go to the first subtitle and adjust the SubCap parameters, such as Text Appearance and Box Appearance.
I’m sure there are many ways to create the same outcome. This is a workflow that worked for me.
If you have any questions or if I can help you with your subtitling, please get in touch.