When starting out as a video production freelancer buying videography lighting kit will be an essential consideration. In this blog post, I explain some of the factors and decisions I took when purchasing my lights and lighting kit.
Buying your first lights
The very first light I bought when I started filming was a 12” square flat LED Techpro Felloni daylight panel. The main reason I decided to buy this large soft light was that it was especially suitable for filming faces and interviews. It gives a beautiful white light reflection in the eye when used in close-up. Another benefit was that it was lightweight and came in a convenient carry case. Making sure everything I purchase is portable and lightweight is very important to me as I usually work as a one-person operator. It helps if I can carry everything I need in my filming kit by public transport if required.
Battery-powered
This standard output Felloni light that I initially purchased could also run on small and light Sony NP batteries. I was already using these NP batteries in my kit, so sticking to one battery type was also an important decision when I started to purchase my videography lighting kit. Looking back, I am happy with the decision I made to buy this particular light to start my collection of lighting equipment. At that time, at the start of my freelancing career, the bi-colour version of the same lights was not affordable for me, although that would have been preferable. Eventually, as time progressed, I bought another Felloni unit together with two softboxes and two grids which I continue to use frequently. These two Felloni LED units are especially suitable for lighting faces with the softbox and grids and also for creating a perfectly flat-lit chroma key background. Nowadays, there are more modern and powerful versions of these lights also available but, as they need heavier V-mount batteries (or access to mains electricity), they are less practical for me because of the extra battery weight.
Using coloured gel filters
When I first used these daylight colour temperature lights, I used a white balance card with my camera to calculate how to set the right colour temperature for filming as I did not own a light meter at that time. When required, I added square CTO (Colour Temperature Orange) or CTB ( Colour Temperature Blue) filters of the right gradation over the LED panel. I secured these coloured gels with two metal strips which came with the lights and stuck to a magnet in the light unit. It was a little bit fiddly when using the gels with softboxes and grids. My recommendation would be that it would always be preferable to start your collection with the bi-colour versions of the lights you require (finances permitting) as you don’t then need to worry about different colour gels.
Buying my first spotlight
The next light I bought to add to my kit was a Dedo Series 4 LED 40-watt bi-colour high CRI (Colour Reference Index) which I’d wanted to buy for a long time. At the same time, I purchased a softbox, a projector and a gobo set to go with the light unit. This light is powered by mains electricity only and comes with a separate combined power and control unit. This light can be used as a backlight or as a key or fill light with the softbox. It’s a very powerful light and, without the softbox, I’ve even used it at a large event to help light an under-lit presenter far away on stage. I love using this light as it’s enabled me to improve the overall visual aesthetics of my projects. For the first time, I was able to help separate the foreground from the background visually using artificial light on interviewees. This light made me feel excited about the future possibilities for filming that lay ahead. That’s the kind of difference good light can make to your visual images just as much as a great lens and a beautiful camera.
My second spotlight
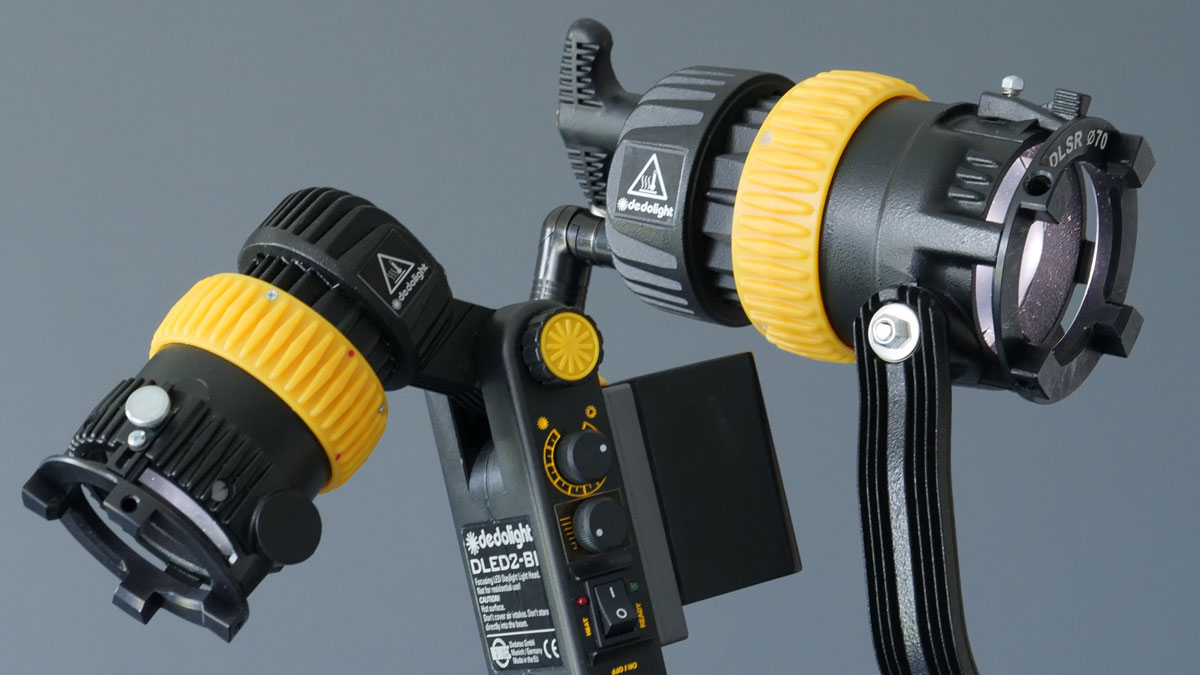
Soon after buying my first Dedo spotlight, I was able to buy a second spotlight. This time, I purchased the more affordable and less powerful Dedo DLED2.1 LED 20-watt bi-colour with a softbox. This unit is much smaller than my first Dedo spotlight and comes with a combined power and control unit that accepts either mains power or a Sony style NP battery. Having a battery power option for this light is useful for setting up quickly on location. I use NPF1000 large-capacity batteries which have always lasted as long as necessary when using with this light. Generally, I now use this smaller spotlight for backlighting interviews, creating an edge light or for product promotional shoots.
Smaller more affordable LED panels
Two different Aputure LED small lights have been added to my kit. The Aputure Amaran AL-F7 is a good quality bi-colour light that also runs on NP batteries. I’ve even now used it as a key light although it’s small size means less white light shows in the interviewees’ eyes compared with that shown when using the Felloni light. The Aputure Amaran AL-M9 is a tiny credit-card-sized light, surprisingly super bright, specifically for on-camera use. It’s so small and light, it has an internal battery that you can charge via USB and is even light enough for my gimbal. It provides one-colour daylight temperature but also comes with small gels filters that can be added onto the front of the camera if required.
Using a light meter
Recently, I installed a light meter app on my iPhone, and this piece of kit has had the most significant impact on my footage filmed recently. It is called Cine Meter II and is used in combination with a small piece of plastic called the Luxi Universal Light Meter for Smartphone. For the first time, I have been able to precisely measure the colour temperature (or Kelvin) of the lights I’m using and of the light on the subject. With the app calibrated, I now use it on every shoot and can now finely tune my bi-colour lights to match the correct colour temperature. It’s been an absolute revelation to see how things like diffusion and the attributes of each light can affect the actual colour temperature.
Support stands
To support my videography lighting kit, I have several Manfrotto stands, including the Manfrotto 5001B Nano Stand which extends very high for high backlights and the Manfrotto 156BLB Low Mini Pro Stand, which is a compact mini stand for lower seated subjects. The combination of both types of stands works very well for me in a variety of situations.
Studio and stage lights
I’ve worked on many live performances, and scripted projects where I’ve been able to use massive 500W, 1000W and 2K studio tungsten lights, as well as other high CRI, LED and AV lights. As well as using my own videography lighting kit it’s been a real pleasure to work with different lighting designers and professionals and to get more insight into the craft skill of lighting.
Light your future
The prospect of spending more time working with ever-improving videography lighting kit is fascinating to me as a professional freelance videographer. The recent ‘COVID-19’ lockdown has been an excellent opportunity to play with various lighting setups and to experiment at home. I would recommend spending any spare time on experimental filming with any light you have access to. As well as lights, you can also consider other ways to sculpt and manipulate light. Using a reflector, you can bounce light from the sun or a spotlight onto another surface or onto the subject. By adding diffusion to the light source, you can soften the shadows and create a different look.
This page about videography lighting kit contains some affiliate links. I only add links to products which I either have personal experience of or know they will help my readers. If you click on one of the links and buy the product, I may receive a tiny commission (at no additional price to you). I don’t allow any adverts on my website. Please get in touch if you have any questions.
