Macro videography is the art of filming tiny things or larger subjects in close-up detail. As I’ve always had an interest in macro visuals, I decided to dedicate some time to explore macro videography and learn new skills from the experience.
Macro filming case study
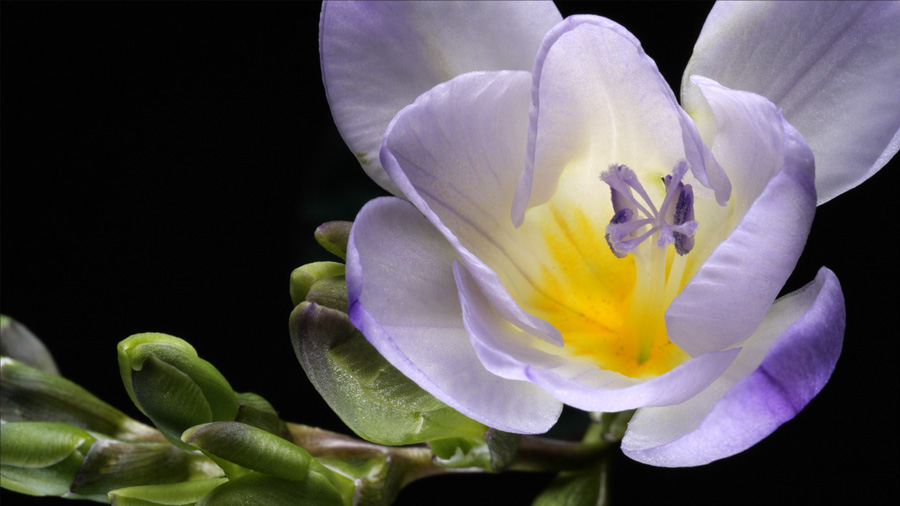
For my first macro videography case study video (featured below), I decided to film the fine details of a selection of freesias in a variety of colours during several separate filming sessions. My home-based studio was the ideal filming location as I could blackout my windows and use only suitable artificial lighting.
As a result of learning more about this art through my first macro filming experience, I thought it would be helpful to provide a useful list of macro videography filming tips for anyone experimenting in this field.
Macro filming tips
The points below reflect some of the key lessons I learned from spending a few days filming close-ups and macro videos.
Macro lenses vs extension tubes
For my first foray into macro filming, I used a set of extension tubes to try them out with my existing range of lenses. Using extension tubes is an affordable option as they are quite cheap. Although I created some high-quality macro videos using this method, I did not feel that I had sufficient control of the process.
To explore macro filming options further, I decided to experiment with an Olympus M.ZUIKO 60mm F2.8 Macro lens for comparative results. Using this lens made me realise the difference in quality a dedicated macro lens could make to this type of filming. If you do not have a macro lens, you might find it more economical to rent one for occasional macro videography.
From my London-based experience, I have found the Fat Lama website to be beneficial for providing more affordable access to a range of high-quality video production kits for hire.
Macro filming location
Filming in an environment where you control both natural and artificial light will enable you to explore a wider range of shots. Also, I found it essential to film on either a solid, vibration-free floor or to remain motionless whilst macro filming. The vibrations of very fine movements will disturb the subject or the camera.
Lighting for macro filming
For macro videography, it would be preferable to have a choice of suitable hard and soft lights for filming, especially if you plan to use a very low ISO and a higher frame rate. For my studio lighting setup to film the freesia flowers, I found I needed 3 x LED panel lights and used a Dedolight DLED2 bicolour spotlight to backlight the freesia petals. You might need to adjust how the light falls on the subject depending on the subject and the visual aesthetic you are looking to create.

Clean lenses and sensors
My first real macro shoot was also the first time I realised I had to clean a camera sensor myself, as a slight dark blur was appearing in some of my footage. In-camera sensor cleaning, lens cleaning, and blowing the sensor with my Giottos rocket blower did not clear the small, dark blur from my filmed videos.
After researching a few ‘how-to videos,’ I used one PEC-PAD cleaning tissue taken from a sealed bag and gently wiped it across the sensor using one finger. The impression I gained from my first macro filming was that the lens, camera sensors, and any filmed objects need to be especially spotless.
Filming with movement
Adding movement to either your subject, the camera, or the lighting adds visual interest to macro videography. However, I found that any movement needs to be incredibly smooth to achieve the best results. For my first attempt to add movement to my freesia filming, I purchased a cheap turntable from Amazon.
Once I started using it, I realised that this cheap turntable used a stepper motor, so it moved in very fine steps rather than providing continuous, smooth movement. As this was not suitable for macro filming, I invested in a Syrup Genie min II and Syrup turntable.
I found that the Genie is perfect for macro videography. It is very adjustable via an app on my iPhone, and the Syrup motorised turntable can then be set for very slow, fine rotational movements. I have also experimented using a camera slider combined with a Syrup Genie II linear motor to create perfectly smooth slides. For my next macro filming session, I will explore using both devices.
Camera frame rates
You may like to explore filming at different frame rates to see how that affects your footage, especially when moving the camera and/or the subject. I began my first macro filming at 25p and then moved on to 50p to observe the different effects. Filming at higher frame rates means much larger file sizes. Higher frame rates also mean you will need more light for the same ISO and aperture settings.
Composition
One advantage of filming in a controlled space, such as a studio or at home, is that it allows you to explore alternative camera angles, set designs, backgrounds, and lighting positions. Any or all of these can significantly alter the appearance of your filming subject.
Subject mounting
Consider how you will mount or position your subject for filming. For objects that are alive or have a short shelf life, consider their environmental requirements when setting up for filming. Once I had decided to film freesias in close-up, it took me a while to work out how best to support them for filming. Many different solutions were explored to help them remain in fixed positions. The problem was resolved by taping a straight piece of stiff wire from a wire coat hanger to the single flower stems. I also put the stems in floral foam to help keep the flowers hydrated during the long filming sessions. Each flower could then be precisely positioned for macro filming.
Reviewing your footage
I found that continually reviewing the filmed macro footage on a large screen was a helpful way to see what setups were working best for my subject. I used one of my 24″ calibrated edit monitors to show the colours and lighting at their best.
Time for filming
In conclusion, I found that macro videography took a great deal longer than I had expected. Preparation alone takes a certain amount of testing to explore the set-up and camera kit to work out how best to film the subject. However, I am delighted with my first macro videography production (shown here) and believe it was well worth the time and patience required to produce it.
A selection of my freesia macro shots are now available to download for free from my stock video collection.